027 Binquadric Finger Counting & Adding
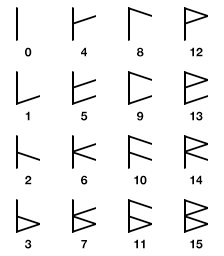
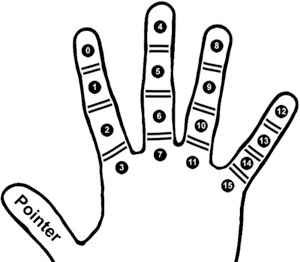
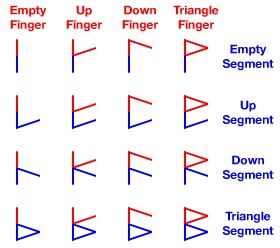
One way to possibly make it easier to memorize the associations is to break up the glyph into two pieces. The top portion of the glyph tells you the finger, while the bottom portion tells you the knuckle, (or segment).
ex. If the top looks like a triangle, then it’s on the pinky finger...
A similar method could be worked out to identify the bottom portion. Though it’s helpful for beginners, having a system to help you figure out what glyph goes where, it might just be easier to create some flash cards and memorize the positions. For experimenting purposes, I have sometimes drawn the glyphs on a glove. For the purposes of learning these concepts, simply use the illustrations provided.
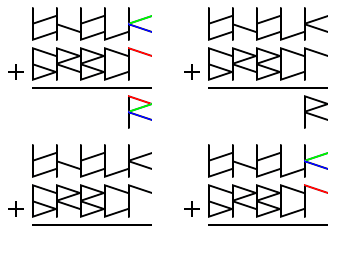
The next column is trickier though. The first step is to locate the position on the hand that’s associated with the first glyph.
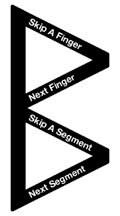
Upper Top = skip or jump over one finger.
Upper middle = slide to the next finger.
Lower middle = skip or jump over one segment.
Lower Bottom = slide to the next segment.
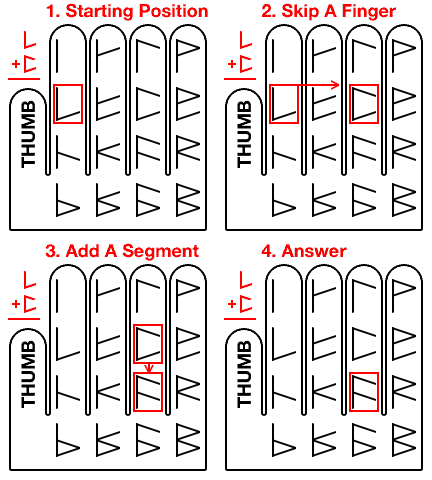
There are no middle sub digits, but there is a bottom sub digit. This indicates a movement of one segment. So we slide the thumb downwards to the next segment.
The ending position is our answer. We write this glyph down and continue to the next column.
Of course, it’s probably worth mentioning that if you switched the glyphs around, starting with the second glyph and then added the first glyph, the operation would have been much simpler. Just as in decimal addition, the mind will eventually work out shortcuts with practice.
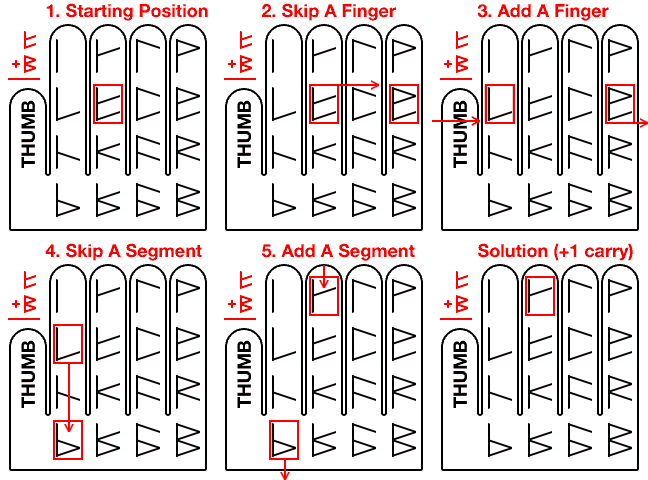
We skip a finger over to the pinky finger, (representing the upper top sub digit).
Then we proceed to add one finger, (representing the upper middle sub digit), but we find that we’ve run out of fingers. So, we jump back to the forefinger, and commit to memory that we will need to ‘carry one’.
Then we skip a segment, (represented by the lower sub digit), landing us on the callused pad at the base of the forefinger.
Now we just need to add just one more segment, (represented by the bottom sub digit). We jump back to the top of the finger, but this time, we shift over to the next finger. This extra shift represents our ‘carry one’, so we do not have to commit this carry to memory.
There’s our answer, ‘carry one’ plus the fifth segment. If we were to translate what we’ve done into mainstream hexadecimal, we’d find that we just calculated: 5 + F = 14
Just as in the last column that we added, there is also a shortcut here. In decimal, some people use a shortcut when adding nine. To figure out seven plus nine, they take seven minus one and place a one in front. The same thing can be done when adding F. There are numerous shortcuts that can be used, but after enough use, you’ll find that for faster calculations, it’s worth it to memorize the entire addition table.

