
002 Converting RGB Files To Grayscale
For Photoshop v6 to present.
This episode shows multiple techniques for Grayscale conversion. A set of Actions is included to help automate the procedures. These techniques are based on concepts learned in episode 001.
Download Grayscale Conversion Actions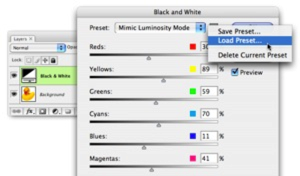
Update!
April 16th, 2007
Photoshop CS3 Released!!!
CS3 uses a new “Black & White” adjustment layer.
Here are the 30-59-11 starting point settings that can be loaded into it:
Download .BLW Settings
TIP: Try switching the layer to luminosity mode after loading these settings. The correction is cancelled out. The color is still intact. Now enter the layer and alter the sliders. It's like having a Selective Color
Legacy Comments:
Greg Apodaca
In further response to Mark Gilvey's comment in episode 001, yes, these are all just different ways to skin a cat. They all have unique benefits and, unfortunately, pitfalls. You may find that one way works better than another for large projects, or maybe a problem image may require a more complex technique.
What this episode touches on, is that by keeping the colors intact, the color information can be manipulated to control the conversion. Something I may eventually show, if I do an episode on CMYK techniques, is that multiple adjustment layers can be used between the color image and one of these constraining conversion layers to manipulate the final image.
For example, a Selective Color adjustment layer can be used (under a Monochrome Channel Mixer layer) to target and change how individual colors map. Or maybe you could use a Curves layer to heighten contrast in the green channel while flattening contrast in the red channel to better maximize the final converted detail...
Monday, September 18, 2006 - 12:34 AM
mgilvey
Great show man! Keep them comming.
Wednesday, September 20, 2006 - 10:24 AM
caffeinerush
Thanks for shedding some light on the subject! I always desaturated images, until now.
Wednesday, October 4, 2006 - 04:25 PM
Greg Apodaca
If you like using the Command u shortcut (Control u on the PC) to quickly desaturate images, immediately use the Command Shift f shortcut (Control Shift f on the PC) to Fade the correction into color mode.
Wednesday, October 4, 2006 - 04:52 PM
wkidwell
nice!!
the photoshop alchemist is squeezing water out of a stone agian!
thx for opening my mind to new possibilities in the world of color and photoshop.
watching you work is like listening to that jimi hendrix instumental "midnight".
thx man
Thursday, October 5, 2006 - 08:33 AM
chester
excellent !!!! really learned a lot here. thought i knew all about grayscale conversions already, but NOT.
Friday, October 20, 2006 - 09:42 AM
Anonymous
Very helpful information! Just discovered your podcast and really think it is great!
Monday, November 6, 2006 - 05:04 PM
Mark
Yes - I also modified the Russel Brown technique for CMYK also by putting a monochrome channel mixer set to values 55,42,42,8. Works for some but tends to blow some values. You can also use selectve color underneath instead of a hue/sat layer. I wonder what your technique is?
Tuesday, November 7, 2006 - 08:25 AM